
Spring: 스프링 입문기
2022, May 08
내가 쓰는 스프링의 등장이란?
과거 자바의 프레임워크를 설정할 때 JAVA SE 버전과 기업형 JAVA EE(엔터프라이즈)버전을 채택하여 트랜잭션 등의 개발편의와 생산성을 극대화했다.
그런데 JAVAEE는 유료버전이었기 때문에 접근에 제한이 있었다. 그리고 마침 엔터프라이즈와 기능이 동일한 스프링이 등장하여 JAVASE+Spring이라는
현재의 모습에 이르게 되었다. (라는게 내가 알고 있는 수준)
프로젝트 환경설정
프로젝트 생성
사전준비물
- Java 11 설치
- IDE : IntelliJ
- 스프링프로젝트 생성 : 스프링부트 스타터 사이트
- 프로젝트 선택
- Project : Gradle
- Spring Boot : 2.6.7
- Language : Java
- Packaging : Jar
- Java : 11
- Project Metadata
- groupId : hello
- artifactId : hello-spring
- Dependencies
- Spring Web
- Thymeleaf
Gradle Setting
plugins {
	id 'org.springframework.boot' version '2.6.7'
	id 'io.spring.dependency-management' version '1.0.11.RELEASE'
	id 'java'
}

group = 'hello'
version = '0.0.1-SNAPSHOT'
sourceCompatibility = '11'

repositories {
	mavenCentral()
}

dependencies {
	implementation 'org.springframework.boot:spring-boot-starter-thymeleaf'
	implementation 'org.springframework.boot:spring-boot-starter-web'
	testImplementation 'org.springframework.boot:spring-boot-starter-test'
}

tasks.named('test') {
	useJUnitPlatform()
}
- 동작 확인
- 기본 메인 클래스 실행
- 스프링 부트 메인 실행 후 localhost:8080 접근하여 에러페이지 확인(정상)
IntelliJ Gradle 대신 자바 직접 실행
최근 IntelliJ 버전은 Gradle을 통해 실행하는 것이 기본 설정인데, 실행속도가 느린 단점이 있다.
다음과 같이 변경하면 자바를 바로 실행하여 실행속도를 빠르게 할 수 있다.
- Preferences -> Build, Execution, Deployment -> Build Tools -> Gradle
- Build and run using : Gradle -> IntelliJ IDEA
- Run Tests using : Gradle -> IntelliJ IDEA
라이브러리 살펴보기
Gradle은 의존관계가 있는 라이브러리를 함께 다운로드 한다.
스프링 부트 라이브러리
- spring-boot-starter-web
- spring-boot-starter-tomcat: 톰캣 (웹서버)
- spring-webmvc: 스프링 웹 MVC
- spring-boot-starter-thymeleaf: 타임리프 템플릿 엔진(View)
- spring-boot-starter(공통): 스프링 부트 + 스프링 코어 + 로깅
- spring-boot
- spring-core
- spring-boot-starter-logging
- logback, slf4j
테스트 라이브러리
- logback, slf4j
- spring-boot
- spring-boot-starter-test
- junit: 테스트 프레임워크
- mockito: 목 라이브러리
- assertj: 테스트 코드를 좀 더 편하게 작성하게 도와주는 라이브러리
- spring-test: 스프링 통합 테스트 지원
View 환경설정
Welcome Page 만들기
resources/static/index.html
<!DOCTYPE HTML>
<html>
<head>
    <title>Hello</title>
    <meta http-equiv="Content-Type" content="text/html; charset=UTF-8" />
</head>
<body>
Hello
<a href="/hello">hello</a>
</body>
</html>
- 스프링부트가 제공하는 Welcome Page 기능
static/index.html을 올려두면 Welcome page 기능을 제공한다.- 스프링공식 DOC
- thymeleaf 템플릿 엔진
- thymeleaf 공식 사이트: https://www.thymeleaf.org/
- 스프링 공식 튜토리얼: https://spring.io/guides/gs/serving-web-content/
- 스프링부트 메뉴얼: https://docs.spring.io/spring-boot/docs/2.3.1.RELEASE/reference/ html/spring-boot-features.html#boot-features-spring-mvc-template-engines
java/hello/hellospring/controller/HelloController.java
@Controller
  public class HelloController {
      @GetMapping("hello")
      public String hello(Model model) {
          model.addAttribute("data", "hello!!");
          return "hello";
      }
}
resources/templates/hello.html
!DOCTYPE HTML>
  <html xmlns:th="http://www.thymeleaf.org">
  <head>
      <title>Hello</title>
      <meta http-equiv="Content-Type" content="text/html; charset=UTF-8" />
  </head>
<body>
<p th:text="'안녕하세요. ' + ${data}" >안녕하세요. 손님</p>
  </body>
  </html>
동작 환경 그림
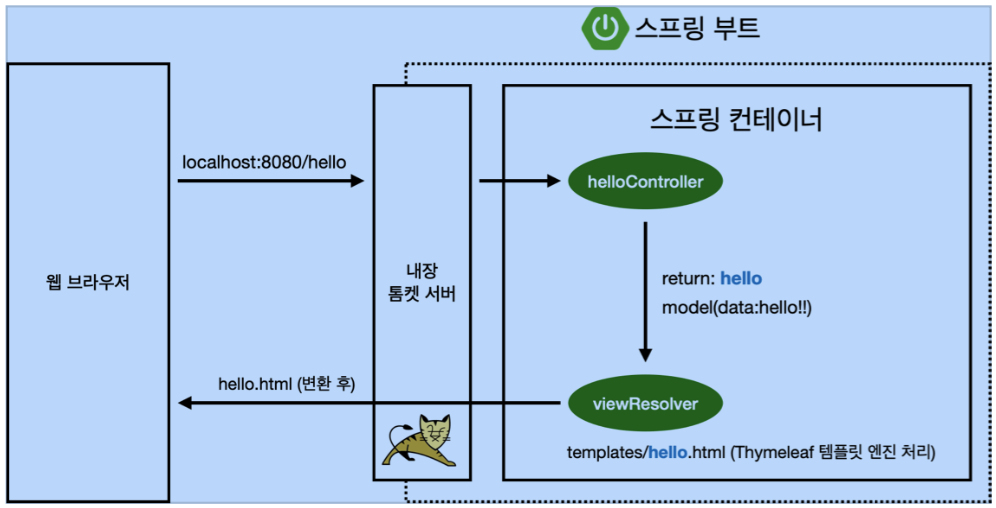
- 컨트롤러에서 리턴 값으로 문자를 반환하면 뷰 리졸버( viewResolver )가 화면을 찾아서 처리한다.
- 스프링 부트 템플릿엔진 기본 viewName 매핑
resources:templates/+{ViewName}+.html
참고: spring-boot-devtools 라이브러리를 추가하면, html 파일을 컴파일만 해주면 서버 재시작 없이 View 파일 변경이 가능하다. 인텔리J 컴파일 방법: 메뉴 build -> Recompile
빌드하고 실행하기
콘솔로 이동
./gradlew buildcd build/libsjava -jar hello-spring-0.0.1-SNAPSHOT.jar- 실행확인